Posts

MS Excel Formulas in Hindi

Image
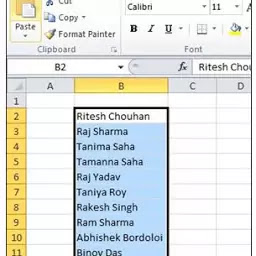
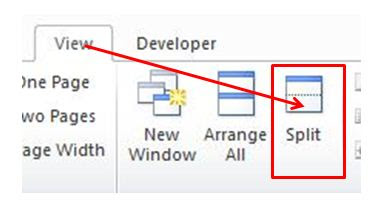
Top How to use Custom List in Excel In this tutorial I will explain how to use Custom List, Rand Between and rank Formula in excel. Here I use a simple mark sheet as an example. इस ट्यूटोरियल में मैं कस्टम लिस्ट , Rand Between और रैंक फॉर्मूला का उपयोग करने का तरीका बताऊंगा। यहाँ मैं एक उदाहरण के रूप में एक साधारण मार्क शीट का उपयोग करता हूं। Custom List Formula in Excel: Custom List is a series which you can store in excel for later use. For example I have some Students name and I want to store it in excel. कस्टम सूची एक श्रृंखला है जिसे आप बाद में उपयोग के लिए एक्सेल में स्टोर कर सकते हैं। उदाहरण के लिए मेरे पास कुछ छात्रों का नाम है और मैं इसे एक्सेल में संग्रहीत करना चाहता हूं Solutions: Select the name list and Click on File ==> Options ==> Advanced ==> Edit Custom List which is shown below in Fig 1 and Fig 2

Choose function in Excel

Image
Top Choose function in Excel Choose function in Excel : In this excel tutorial we are going to learn how to use the excel choose function. Here I create a salary table with the help of choose function which is shown below in Fig 1. इस एक्सेल ट्यूटोरियल में हम यह जानने जा रहे हैं कि एक्सेल Choose फ़ंक्शन का उपयोग कैसे करें। यहां मैं Choose फ़ंक्शन की मदद से एक वेतन तालिका बनाता हूं जिसे नीचे चित्र 1 में दिखाया गया है।

Using IF Formula in Excel for Icon

Image
Top Using IF Formula in Excel for Icon Friends, in this tutorial " How to set icon in Excel using IF formula " I am going to teach you how to set icon according to your data. So, let start the tutorial to learn this simple tricks. First, create a table similar to mine as shown below in Fig 1. दोस्तों , इस ट्यूटोरियल में  " IF  फॉर्मूला का उपयोग करके एक्सेल मे आइकन को केसे set करे " मैं आपको सिखाने जा रहा हूं कि आप अपनी data के अनुसार आइकन कैसे सेट कर सकते हैं। तो , इस सरल tricks को सीखने के लिए ट्यूटोरियल शुरू करें। सबसे पहले , मेरी तरह ही एक टेबल बनाएं जो कि चित्र 1 में नीचे दिखाया गया है।

Excel Logical Functions (IF AND OR)

Image
Top Excel Logical Functions (IF AND OR) In this tutorial I will explain you how to use Excel Logical Functions - IF function, AND function, OR function. Let me give you an example of how to create a "Document Verification" table using Excel Logical Functions (IF AND OR) to understand all the functions in a phased manner. First you create a document verification table which is shown in Fig. 1 below. Excel Logical Functions (IF AND OR) इस ट्यूटोरियलमें मैं आपको समझाता हूँ कि Excel Logical Functions - IF फ़ंक्शन , AND फ़ंक्शन , OR फ़ंक्शन का उपयोग कैसे करें। चरणबद्ध तरीके से सभी कार्यों को समझने के लिए मैं आपको एक उदाहरण देता हूं कि कैसे बनाएं "डॉक्यूमेंट वेरिफिकेशन" तालिका एक्सेल लॉजिकल फंक्शंस ( IF AND OR) का उपयोग करके । पहेले आप एक डॉक्यूमेंट वेरिफिकेशन टेबल बनाएं जो नीचे चित्र 1 में दिखाया गया है।

Excel If Function Multiple Criteria

Image
Top Excel If Function Multiple Criteria The IF formula in Excel is a very powerful formula, because you can solve any complex problems with this formula. To understand the formula easily, let me explain some examples. So, let's start the tutorial. Excel में IF सूत्र बहुत शक्तिशाली सूत्र है , क्योंकि आप इस सूत्र के साथ किसी भी जटिल समस्याओं को हल कर सकते हैं। सूत्र को आसानी से समझने के लिए मैं कुछ उदाहरणों की व्याख्या करता हूं। तो , ट्यूटोरियल शुरू करते हैं।

MS Word 2 Small Tips

Image
Top MS Word 2 Small Tips In this tutorial I am explain 2 small Tips in MS Word . So, let’s start the tutorial –  MS Word Tips 1 Split Window.  Split Window helps us when we want to fixed a paragraph during composing than it helps to do that. Click on View ==> Split which is shown below in Fig 1 and then click on blank space below the paragraph which is shown below in Fig 2. Now click on lower section and compose your document. इस ट्यूटोरियल में   MS Word के 2 छोटे टिप्स बता रहा हूँ। तो , आइए ट्यूटोरियल शुरू करें - एमएस वर्ड टिप्स 1- स्प्लिट विंडो। स्प्लिट विंडो हमें तब मदद करती है जब हम कंपोजिंग के दौरान एक पैराग्राफ को fixed करना चाहते हैं , स्प्लिट विंडो लाने के लिये आपको   क्लिक करना हैं View ==> स्प्लिट जो नीचे चित्र 1 में दिखाया गया है और फिर पैराग्राफ के नीचे रिक्त स्थान पर क्लिक करें जो नीचे चित्र 2 में दिखाया गया है। अब निचले खंड पर क्लिक करें और अपने दस्तावेज़ को लिखें।

Text to Speech in MS WORD 2010

Image
Top Text to Speech in MS Word In this computer tutorial you learn how to add a button in quick access toolbar i.e. Text to Speech in MS Word (speak button). Friends, sometimes when we want to check or review our composed document thoroughly than this work feels so boring but if we work on online than Google translate helps us to listen the matter thoroughly. Now, in MS Word you can add speak button in quick access toolbar to read your text. इस कंप्यूटर ट्यूटोरियल में आप सीखते हैं कि क्विक एक्सेस टूलबार में एक बटन कैसे जोड़ा जाता है , यानी एमएस वर्ड में टेक्स्ट टू स्पीच (स्पीक बटन)। दोस्तों , कभी-कभी जब हम अपने रचित दस्तावेज को अच्छी तरह से जाँचना या उसकी समीक्षा करना चाहते हैं तो यह काम बहुत उबाऊ लगता है लेकिन अगर हम Google अनुवाद में ऑनलाइन काम करते हैं तो हमें मामले को अच्छी तरह से सुनने में मदद मिलती है। अब , एमएस वर्ड में आप अपने टेक्स्ट को पढ़ने के लिए क्विक एक्सेस टूलबार में भी स्पीक बटन जोड़ सकते हैं। How to add Text to Speech in MS Word: To add Text to speech in ms word ...

Social Link