MS Word Table of Contents
MS Word Table of Contents Tutorial
In this tutorial, I am explained how to use Table of Contents in MS Word. So, lets start the tutorial, firstly open your article book or create a book / eBook for e.g I wrote my all articles with article Title/ Heading which is shown below in Fig 1.
इस ट्यूटोरियल में आप सिख पायेगें, कैसे MS Word में Table of Contents का उपयोग किया जाता है। तो, ट्यूटोरियल शुरू करते है, सबसे पहले अपनी लेख पुस्तक या ई-बुक खोलें या एक पुस्तक / ई-पुस्तक बनाएं। मैंने अपने सभी लेख, लेख शीर्षक / शीर्षक के साथ लिखे हैं जो नीचे चित्र 1 में दिखाया गया है।
Fig 1.
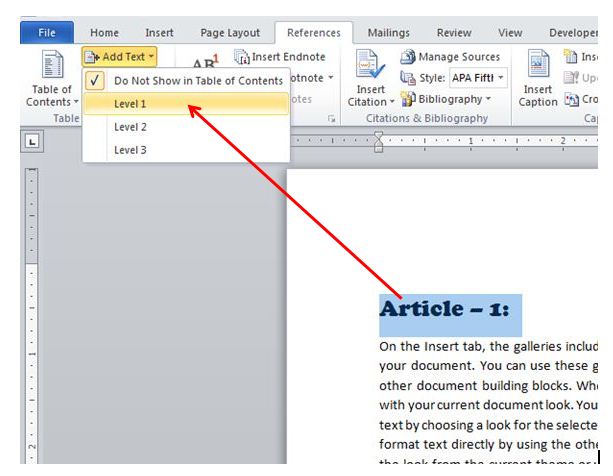
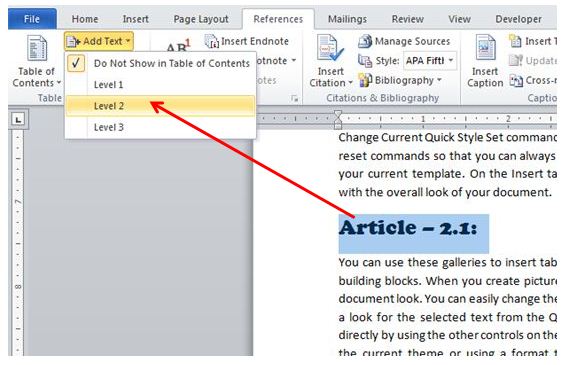
In Table of Contents, there have three levels (level 1, level 2, level 3) i.e main heading goes to level 1, Sub headings of main heading goes to level 2 and finally if you have sub - sub headings than it goes to level 3 for example (Article 1 ....... goes to level 1, Article 1.1 ...... goes to level 2 and Article 1.1.1 .... goes to level 3 than again if you have Article 2 than it goes to level 1 and so on) Now, select the Article heading and go to Reference tab ==> Click on Add Text from Table of Contents and select level 1 which is shown below in Fig 2.
तालिका की सामग्री (Table of Contents) में, तीन स्तर हैं (स्तर 1, स्तर 2, स्तर 3) अर्थात मुख्य शीर्षक 1 स्तर पर जाता है, मुख्य शीर्षक के उप शीर्ष स्तर 2 में जाता है और अंत में अगर आपके पास उप शीर्षक के उप-शीर्ष स्तर है तो यह स्तर 3 में जाता है। उदाहरण के लिए (अनुच्छेद 1 ....... स्तर 1 पर जाता है, अनुच्छेद 1.1 ...... स्तर 2 पर जाता है और अनुच्छेद 1.1.1 .... स्तर 3 पर जाता है ओर अगर आपके पास अनुच्छेद 2 है तो फिर से यह स्तर 1 पर जाता है) अब, लेख शीर्षक का चयन (select) करें और Reference टैब पर जाएं ==> Add Text पर क्लिक करें और स्तर 1 चुनें जो नीचे चित्र 2 में दिखाया गया है।
Fig 2.
Fig 3.
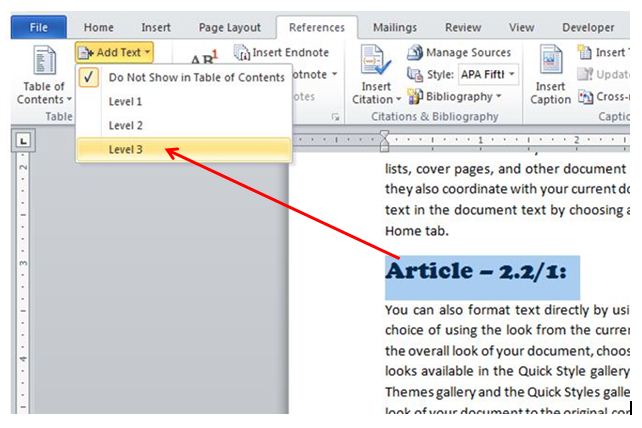
Now, if you have sub - sub heading again than click on level 3 from Add Text in Table of Contents which is shown below in Fig 4. otherwise choose level 1, level 2 as per your Article.
अब, यदि आपके पास उप - शीर्ष शीर्षक है, तो सामग्री के तालिका में Add Text से स्तर 3 पर क्लिक करें जो नीचे चित्र 4 में दिखाया गया है। अन्यथा अपने लेख के अनुसार स्तर 1, स्तर 2 चुनें।
Fig 4.
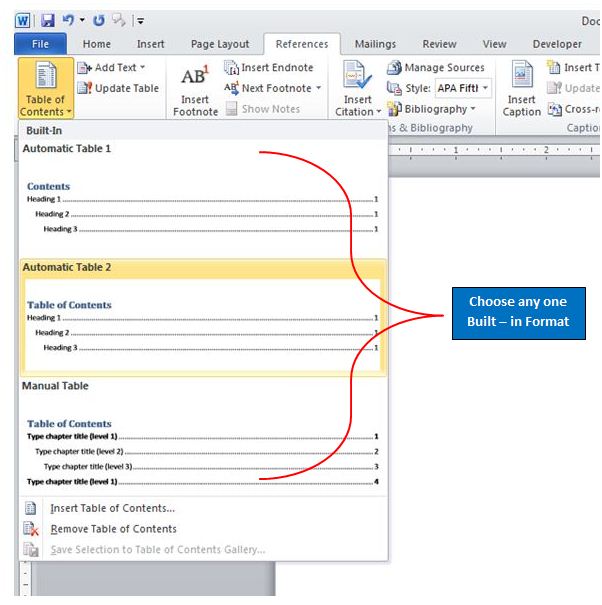
Create all your heading level in this way, than click on Table of Contents from Reference Tab, Table of Contents, and choose any one Built - in Format for your document which is shown below in Fig 5.
इस तरह से अपने सभी शीर्ष स्तर बनाएं, Reference टैब से Table of Contents पर क्लिक करें, सामग्री तालिका, और अपने दस्तावेज़ के लिए किसी भी निर्मित प्रारूप को चुनें, जो नीचे चित्र 5 में दिखाया गया है।
Fig 5.
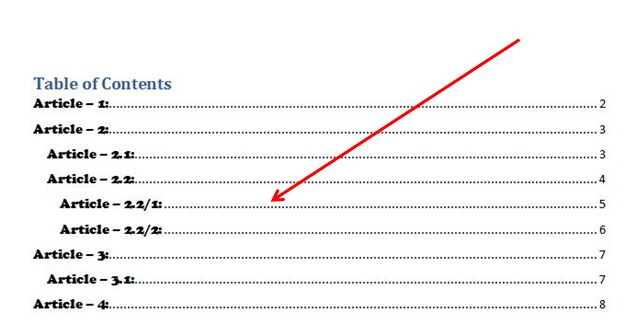
Now, you have a Awesome Table of Contents along with Page Number and the main benefit to use table of contents is you can jump any article / post by pressing Ctrl + Click on that article / post heading and another benefit is you can easily create your book index by using this ms word table of contents, here is the output after click on the format of table of contents which is shown below in Fig 6.
अब, आपके पास पृष्ठ संख्या के साथ सामग्री की एक बहुत बढ़िया तालिका है और सामग्री की तालिका का उपयोग करने का मुख्य लाभ यह है कि आप किसी भी लेख / पोस्ट को Ctrl दबाकर उस लेख / पोस्ट शीर्षक पर क्लिक करके उस लेख / पोस्ट पर जा सकते हैं और एक अन्य लाभ यह है कि आप आसानी से अपना पुस्तक सूचकांक (book index) बना सकते हैं इस एमएस वर्ड Table of Contents का उपयोग करके Table of Contents के प्रारूप पर क्लिक करने के बाद आप आउटपुट देख सकते है जो नीचे चित्र 6 में दिखाया गया है।
Fig 6.
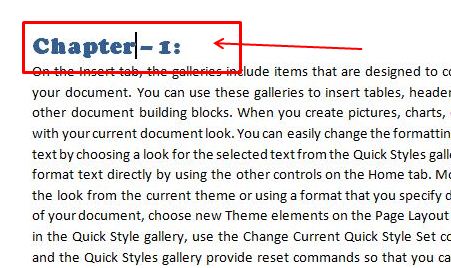
Now, most important part of this table of contents is - if you changed the heading text which is shown below in Fig 7. than how it applies in table of contents which you already created earlier.
अब, सामग्री की इस तालिका का सबसे महत्वपूर्ण हिस्सा है - यदि आपने शीर्षक पाठ को बदल दिया है जो नीचे चित्र 7 में दिखाया गया है। यह उस सामग्री की तालिका में कैसे लागू होता है, जो आपने पहले ही बनाई थी।
Fig 7.
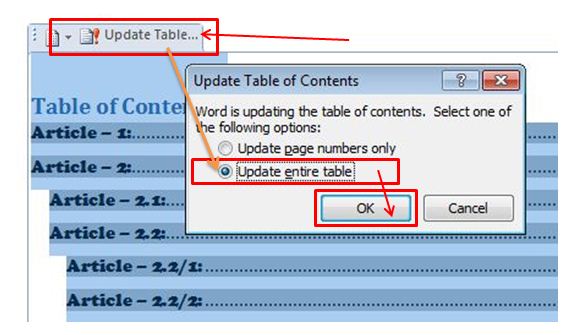
Steps to follows: To change the table of contents according to your updated heading text Click on table of contents => Update table => Choose Update entire table => Click on OK which is shown below in Fig 8.
निम्न चरणों का पालन करें: अपने अद्यतन किए गए शीर्ष लेख के अनुसार सामग्री की तालिका को बदलने के लिए सामग्री की तालिका पर क्लिक करें ==> Update Table ==> Update entire Table ==> OK पर क्लिक करें जो कि चित्र 8 में दिखाया गया है।
Fig 8.
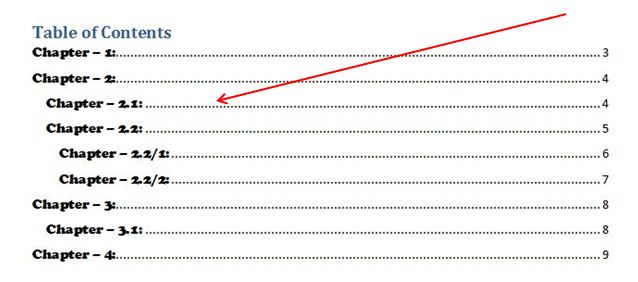
Now you can see your updated Table of Contents according to changed heading text which is shown below in Fig 9.
अब आप परिवर्तित शीर्षक पाठ के अनुसार अपनी अद्यतन तालिका देख सकते हैं जो चित्र 9 में नीचे दी गई है।
Fig 9.
**** End of Tutorial - MS Word Table of Contents ****
========================================================================



Comments
Post a Comment
Please do not enter any spam link into comment box.