MS Word Mail Merge using Excel Data Source
MS Word Mail Merge using Excel Data Source
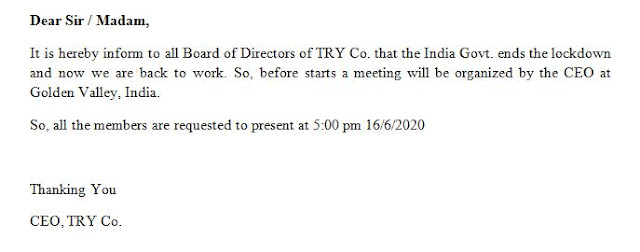
In this tutorial I am going to clear your doubts about MS Word Mail Merge using Excel Data Source, so lets start the tutorial. Firstly open your ms word and write down your matter like letters, application etc. I wrote a letter which is shown below in Fig 1.
इस ट्यूटोरियल मैं एक्सेल डेटा सोर्स का उपयोग करके एमएस वर्ड मेल मर्ज के बारे में आपकी शंकाओं को दूर करने जा रहा हूँ, ट्यूटोरियल शुरू करते हैं। सबसे पहले अपने एमएस वर्ड को खोलें और अपने मामले को लिखें जैसे पत्र, आवेदन आदि। मैंने एक पत्र लिखा हैं जो नीचे चित्र 1 में दिखाया गया है।
Fig 1.
Now, if you have excel data than no need to create again otherwise create an excel data file and write down your data as per your data field requirement, for example in my excel data I only created four data fields like name, address, contact and email and than write down the all records as per your excel table requirements and save it which is shown below in Fig 2.
अब, यदि आपके पास एक्सेल डेटा फ़ाइल हैं तो फिर से बनाने कि जरुरत नेहि हैं, ओर अगर नहीं है, तो एक्सेल डेटा फ़ाइल बनाएं ओर अपने डेटा फ़ील्ड की आवश्यकता के अनुसार अपना डेटा लिखें, उदाहरण के लिए मेरे एक्सेल डेटा में मैंने केवल चार डेटा फ़ील्ड दिये हैं - जैसे नाम, पता, संपर्क और ईमेल अब अपनी एक्सेल टेबल के अनुसार सभी रिकॉर्ड्स को लिखे और उसे save करे - जेसे नीचे चित्र 2 में दिखाया गया है।
Fig 2.
Now, go to MS Word and Click on Mailings tab ==> Choose Step by Step Mail Merge Wizard from Start Mail Merge which is shown below in Fig 3.
अब, MS Word पर जाएं और मेलिंग टैब पर क्लिक करें ==> स्टार्ट मेल मर्ज से स्टेप बाइ स्टेप मेल मर्ज चुनें जो चित्र 3 में नीचे दिखाया गया है।
Fig 3.
There are six steps to follow, choose Letters from step 1 and click on Next .. than choose Use the current document from step 2 than click on Next .. which is shown below in Fig. 4.
Fig. 4.
Choose Use an existing list ==> Click on Browse and choose your excel file which have your data lists than click on Open ==> Select your data which is shown in Fig 5.
Fig 5.
Now, choose data sheet from the dialog box, in which sheet your data are available than click on OK which is shown below in Fig 6.
Fig 6.
Now select the list of recipients by click on the check box, if you want all the recipients than click on OK which is shown below in Fig 7.
Fig 7.
Finally, we are almost complete our mail merge steps, now click on step 3 Write your letter which is shown below in Fig 8. but we are already wrote our letter earlier
Fig 8.
So, place your cursor, where you want to place your data fields and choose one by one field from Insert Merge Field into your document which is shown below in Fig 9. & Fig 10.
Fig 9.
Fig 10.
Now, click on Preview Results from the Mailings tab and adjust your field data which is shown below in Fig 11.
Fig 11.
Wow!! just one step to go, Finally Click on Finish & Merge from Mailings tab and choose any one option to apply, if you choose Edit Individual Documents, than select any one option from the Merge to New Document dialog box than click on OK which is shown below in Fig 12.
Fig 12.
If you choose Print Document than click on Print which is shown below in Fig 13.
Fig 13.
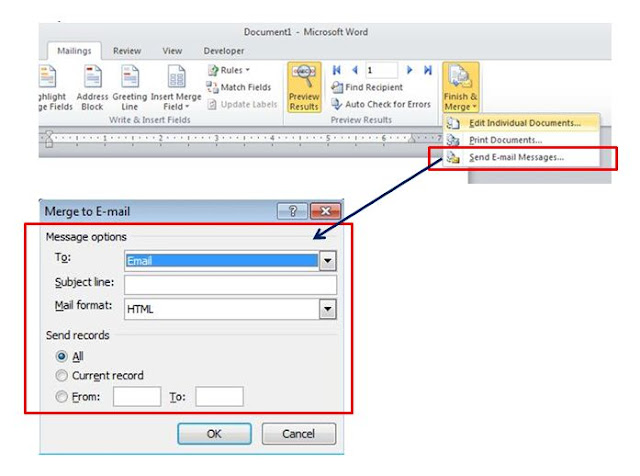
If you choose Send Email Messages which is shown below in Fig 14.
Fig 14.
====================================================================
"End of the tutorial - MS Word Mail Merge using Excel Data Source"
====================================================================


Comments
Post a Comment
Please do not enter any spam link into comment box.